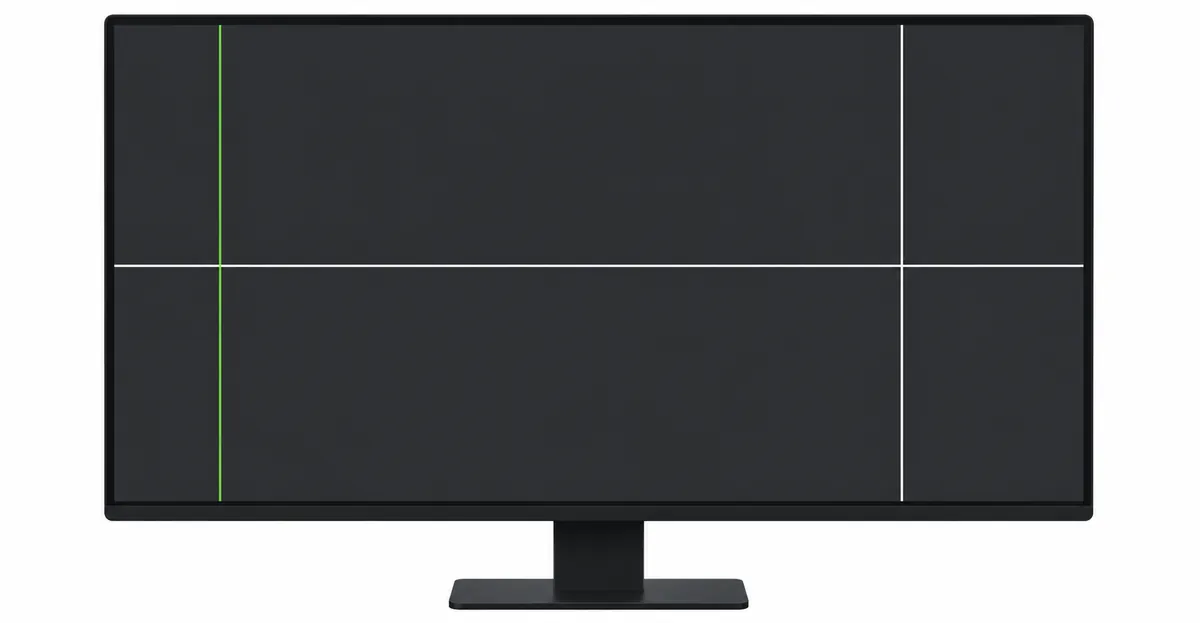
Lines appearing on your computer monitor or laptop screen are among the most common display problems users encounter. Whether you are seeing vertical lines on monitor, horizontal lines on monitor, or unusual coloured lines on screen, understanding the cause is the first step toward finding a solution.
Monitor Lines Problem: Diagnose and Fix Lines on Your Screen
Why Your Monitor Has Lines (and What Type You Have)
A monitor lines problem refers to any situation where straight lines — vertical, horizontal, coloured, or static — appear on your screen and do not go away. These lines persist across all applications, desktops, and boot screens, which distinguishes them from software glitches that come and go.
The lines can be:
- Black or dark: Usually indicate a dead row or column of pixels caused by panel damage or ribbon cable failure
- Coloured: Green, red, purple, or pink lines typically point to signal transmission or sub-pixel circuit failures
- White or faint: Often linked to LCD panel ageing, static discharge, or T-Con board issues
- Single or multiple: A single thin line may indicate a specific transistor failure; multiple lines may suggest broader cable or panel damage
The first question to answer is: what type of line do you have? The direction and colour of the line tells you a great deal about the cause and the fix.
Horizontal vs Vertical vs Coloured — What the Direction Tells You
The direction of a line is the most important diagnostic clue. It tells you exactly which part of the display circuitry has failed.
Vertical lines (top to bottom):
- Point to column electrode failures — the vertical signal pathways that carry data to each pixel column
- Common causes: ribbon cable damage, T-Con board column output failure, aging panel column circuits
- See the vertical LCD lines guide for detailed repair steps
Horizontal lines (left to right):
- Point to row electrode failures — the horizontal signal pathways that select which pixel row to update
- Common causes: gate driver circuit issues, ribbon cable damage, panel row circuit degradation
- See the horizontal LCD lines guide for detailed repair steps
Coloured lines (green, red, purple, pink):
- Point to sub-pixel channel failures — a specific colour channel is broken, while others work
- Green line: red and blue sub-pixels failing; Red line: green and blue failing
- Purple/pink line: red sub-pixels failing (blue dominant)
- See the coloured lines guide for detailed repair steps
White or static lines:
- Point to panel-level circuit issues — entire rows of sub-pixels stuck in the "on" position
- Often accompany aging monitors or T-Con board timing failures
The colour table for sub-pixel failures:
| Line Colour | Failing Channels | What You See |
|---|---|---|
| Green | Red + Blue sub-pixels off | Pure green line |
| Red | Green + Blue sub-pixels off | Pure red line |
| Purple/Pink | Red sub-pixels off | Blue + green = purple |
| White | All sub-pixels stuck on | Bright white line |
| Black | All sub-pixels stuck off | Dead pixel line |
Technical Depth: Understanding LCD Panels and Display Circuits
To truly understand monitor lines, a foundational knowledge of LCD panel technology is helpful.
How an LCD panel works:
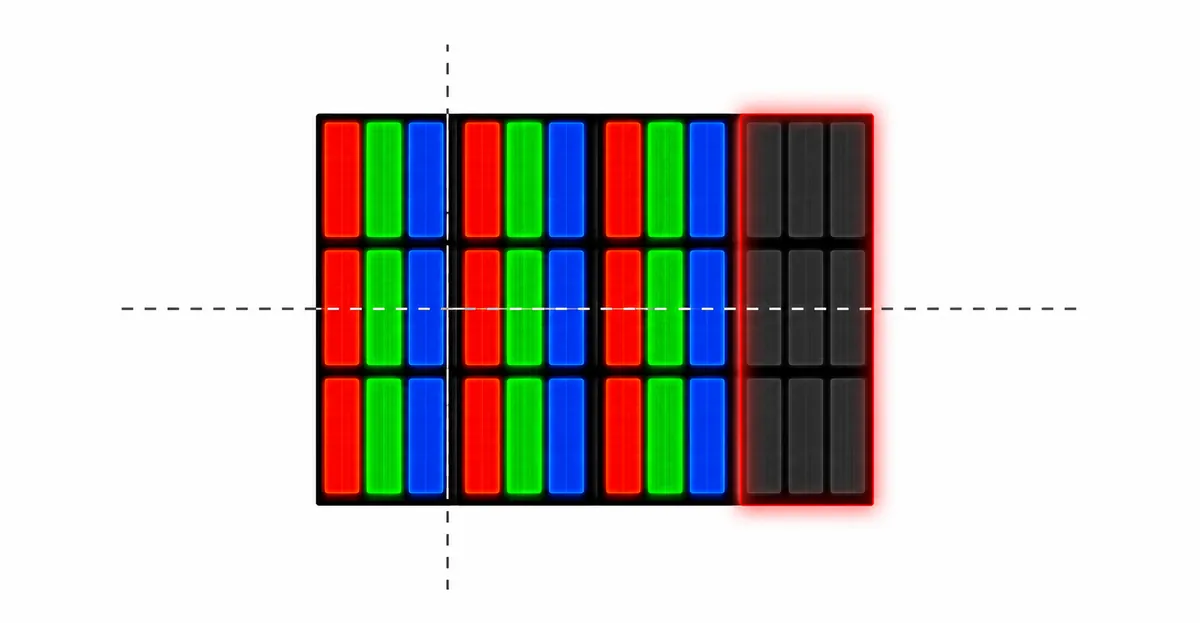
An LCD panel consists of millions of pixels arranged in a grid of rows and columns. Each pixel contains three sub-pixels — red, green, and blue — whose combination produces any colour. Control is achieved through:
- Column electrodes (Source Lines): Carry colour data to each pixel column
- Row electrodes (Gate Lines): Control which pixel row is being updated
- TFT (Thin Film Transistor): A tiny transistor for each sub-pixel that controls its transparency
When signals are interrupted:
When a column electrode fails, all pixels in that column stop receiving correct colour data. The result is a vertical line. When a row electrode fails, all pixels in that row stop receiving update signals — a horizontal line is created.
Why the line colour differs:
The colour of the line shows which specific data channel has failed. When the red channel of a column fails, the affected pixels show only green and blue light — a cyan or turquoise line appears. When the green channel fails, a magenta line appears. When all three channels of a column fail, a black (dead pixel) or white (all pixels "on") line appears.
LVDS/eDP Cable: The #1 Culprit for Monitor Line Problems
The display cable — whether LVDS (older monitors), eDP (modern monitors and laptops), HDMI, DisplayPort, or USB-C — is the single most common cause of lines on a monitor or laptop screen.
Why cables cause lines:
Each display cable carries signals for hundreds or thousands of pixel columns and rows simultaneously. These signals travel as discrete electrical pulses through individual conductors inside the cable. When one of these conductors cracks, bends, or partially disconnects, the signal for specific pixel columns or rows becomes corrupted.
The result is a vertical line (if a column conductor fails) or horizontal line (if a row conductor fails), depending on which signal pathway is affected.
Cable types and their vulnerabilities:
- eDP (embedded DisplayPort): Used in modern laptops and monitors. Carries all display signals on a single thin ribbon cable. Vulnerable to flex damage at hinges (laptops) or bending stress (monitors).
- LVDS: Used in older monitors. Uses multiple conductors in a ribbon cable. Individual conductors can crack over time.
- HDMI/DisplayPort: External cables. Vulnerable to connector wear, cable bending, and electromagnetic interference. Less likely to cause persistent lines than internal cables.
- USB-C/Thunderbolt: Carries display signals alongside data and power. Less common cause of line issues but can fail at the connector.
Signs your cable is the culprit:
- Lines appeared after moving the monitor or laptop
- Lines flicker or change when you move or bend the cable
- The line is thin and perfectly straight
- A different cable produces the same line (confirms the monitor's internal cable, not the external cable)
Fix: Reseat or replace the internal display cable. On laptops, the flex cable replacement typically costs $10–$30. On monitors, internal ribbon cable replacement typically costs $15–$40.
T-Con Board Failure — The Most Common Aging Monitor Issue
The T-Con board (timing controller) is the most likely culprit when a monitor that is more than two years old develops lines. It is also the most commonly misdiagnosed component — users often assume they need a new panel when only the T-Con board needs replacing.
What the T-Con board does:
The T-Con board receives the video signal from your computer and translates it into the precise voltage signals needed for each sub-pixel on the LCD panel. It contains:
- Row driver outputs (for horizontal lines)
- Column driver outputs (for vertical lines)
- Timing circuits that synchronise the display refresh
How T-Con failure produces lines:
When one of the column driver outputs fails, an entire column of pixels stops receiving the correct data signal. The column either goes dark (black line) or gets stuck displaying a single colour (coloured line).
When one of the row driver outputs fails, an entire row of pixels does the same — producing a horizontal line.
Signs of T-Con failure:
- The line is perfectly straight and runs the full width (vertical) or height (horizontal) of the screen
- The line stays in exactly the same position on all inputs
- The line does not flicker when you move the monitor
- A different computer produces the same line
- The monitor is more than two years old
T-Con replacement cost guide:
| Monitor Type | Board Cost | Total Repair |
|---|---|---|
| Standard 22–27" | $15–$30 | $45–$80 |
| Gaming 27–32" | $25–$45 | $65–$115 |
| 4K / professional 32"+ | $35–$60 | $85–$160 |
Before ordering: Open the monitor and photograph the existing T-Con board. The part number is printed on the label — search for it on eBay or Amazon for an exact match. T-Con boards are model-specific; generic replacements may not work correctly.
Panel Circuit Damage — When the Screen Itself Is Failing
Some lines cannot be fixed by replacing cables or the T-Con board because the panel itself is failing. This is the most serious type of monitor line problem.
How panel circuit damage works:
Inside every LCD panel are microscopic conductive traces — called column electrodes and row electrodes — that run through the glass. These traces carry electrical signals from the panel's edge connectors to each pixel. When one of these traces degrades or breaks, the pixels in that column or row stop receiving signals, producing a persistent line.
Why panel damage is different from cable or T-Con damage:
- Cable damage: the signal is not reaching the panel correctly
- T-Con damage: the signal is being generated incorrectly
- Panel damage: the signal reaches the panel but the panel cannot process it
Panel circuit traces are embedded in the glass and cannot be repaired. The only fix is panel replacement.
Signs that the panel itself has failed:
- Lines appeared suddenly with no trigger (no movement, bump, or driver change)
- Lines are perfectly stable — they never flicker or change
- New lines are appearing adjacent to existing ones
- The monitor is more than five years old
- Replacing the T-Con board and cables did not resolve the issue
- Multiple lines are spreading across the screen
Panel replacement cost guide:
| Monitor Size | Panel Cost | Labour | Total |
|---|---|---|---|
| 22–24" | $50–$100 | $30–$60 | $80–$160 |
| 27–32" | $100–$200 | $40–$80 | $140–$280 |
| 32"+ / 4K | $150–$350 | $50–$100 | $200–$450 |
The 50% rule: If the repair cost exceeds 50% of the device's current replacement value, it is usually better to replace the monitor entirely.
Monitor Repair vs Replacement — The $50 Decision Framework
When lines appear on a monitor, the key question is: repair or replace?
Here is a practical decision framework:
Repair the monitor if:
- The monitor is less than three years old
- The repair cost is less than 50% of the monitor's current value
- The monitor has special characteristics that are hard to replace (high refresh rate, colour accuracy, specific panel type)
- You have a warranty that covers the repair
- The line appeared suddenly after a specific event (moving, bumping) that points to a loose cable
Replace the monitor if:
- The monitor is more than five years old
- The repair cost exceeds 50% of the current replacement value
- Panel replacement is required (most expensive fix)
- Multiple problems exist (lines, dead zones, backlight issues)
- You have been planning to upgrade anyway
Repair cost reference:
| Repair Type | Typical Cost |
|---|---|
| External cable replacement | $10–$25 |
| Internal ribbon cable | $15–$40 |
| T-Con board replacement | $45–$160 |
| Panel replacement | $80–$450 |
Graphics Card and Drivers — When the PC Is the Problem
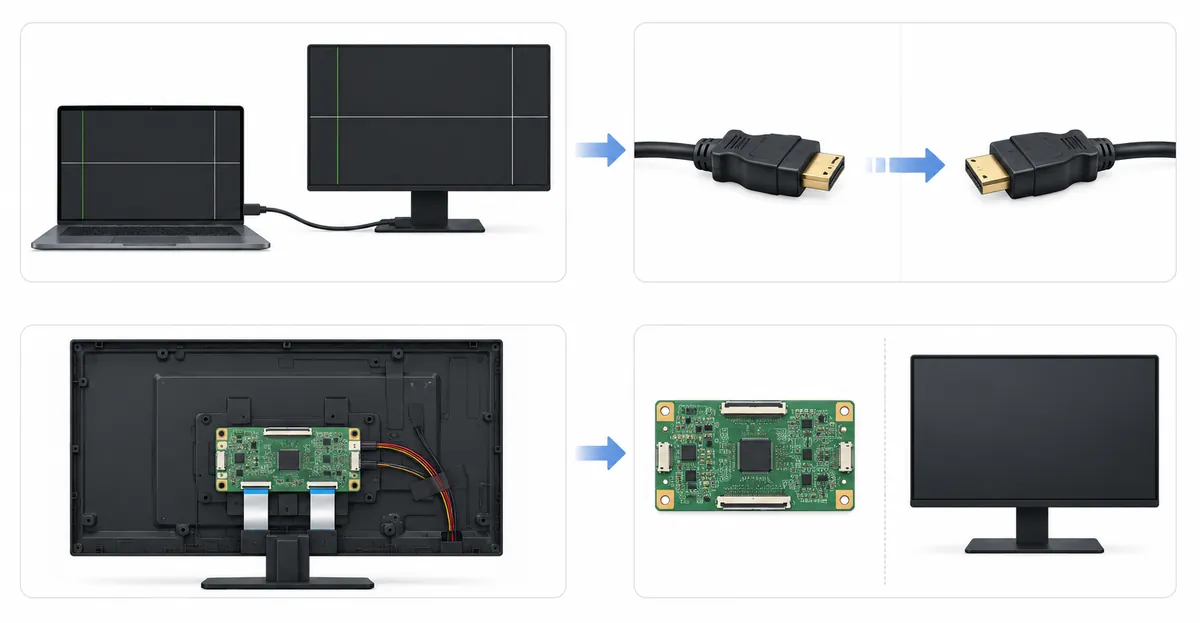
Before opening your monitor, you should rule out whether the graphics card (GPU) or drivers are causing the problem.
How GPU problems cause lines:
The graphics card sends digital signals over the cables to the monitor. When these signals are faulty — due to GPU hardware problems, driver malfunctions, or overheating — specific pixel rows or columns may be affected.
Signs that the GPU is the problem:
- The lines appear only at certain resolutions or refresh rates
- The lines disappear when you change the resolution
- A different monitor shows the same lines on the same computer
- The lines started after a driver update
- The GPU is overheating or making unusual noises
Steps to diagnose the GPU:
- Update your graphics drivers to the latest version
- Change the resolution and refresh rate
- Test with a different monitor or cable
- Check the GPU temperature with tools like MSI Afterburner or HWMonitor
- Disable overclocking if it is activated
- Test the GPU in another system if possible
Laptop users: Integrated GPUs (Intel HD/UHD/Iris) and dedicated GPUs (NVIDIA GeForce, AMD Radeon) can cause different problems. Switch between GPUs in the NVIDIA Control Panel or AMD Radeon Settings to test.
Real Case: A BenQ PD3220U User's $35 T-Con Board Fix
A BenQ PD3220U (4K USB-C monitor) owner reported two thin vertical lines appearing near the centre of the screen. The lines had appeared gradually over several weeks and were visible on all inputs.
Initial assumption: The panel was failing and the monitor needed replacement ($400–$600).
Diagnosis steps:
- Connected the monitor to a different laptop with a different cable — same lines appeared. Confirmed the issue was in the monitor, not the source.
- Searched for the BenQ PD3220U service manual online — found disassembly instructions on iFixit.
- Opened the monitor back panel (12 screws around the perimeter).
- Located the T-Con board near the bottom edge — photographed the label showing the part number.
- Searched eBay for "BenQ PD3220U T-Con board" — found an exact replacement for $35.
- Replaced the board, reassembled the monitor.
- Both vertical lines disappeared completely.
Total cost: $35 for the replacement board.
Key takeaway: Before replacing a monitor that is showing lines, identify the component that is actually failing. A $35 T-Con board replacement saved a $500 monitor from being replaced.
How to Test for Monitor Lines (Step-by-Step)
Follow this testing sequence to diagnose the cause of your monitor lines:
Step 1: Use the screen test tool
Open our free screen test tool and run through the following colour tests:
- Pure black background — dark lines (black, coloured) will be immediately visible against the dark background
- Pure white background — bright lines (white, coloured) will stand out
- Pure red background — a line visible here but not on other colours indicates a specific sub-pixel channel failure
- Pure green background — same principle
- Pure blue background — same principle
Step 2: Note the line characteristics
- Position: Is it vertical or horizontal? Where on the screen (top, bottom, centre, left, right)?
- Colour: Is it black, white, green, red, purple, or another colour?
- Width: Is it one pixel wide, several pixels wide, or many millimetres wide?
- Count: Is it a single line or multiple lines?
- Behaviour: Does it flicker? Does it change with cable movement?
Step 3: Test on a different device
- Connect the monitor to a different computer using the same cable
- If lines persist: the issue is in the monitor (hardware)
- If lines disappear: the issue is in the source computer (GPU, drivers, or port)
Step 4: Test with a different cable
- Replace the HDMI, DisplayPort, or USB-C cable
- If lines persist: the monitor's internal hardware is the issue
- If lines disappear: the external cable was the cause
The OSD Menu Test: The Fastest First Diagnostic Step
Before opening your monitor or replacing any cables, use the On-Screen Display (OSD) menu test — a built-in diagnostic that takes less than 30 seconds and tells you whether your line problem is hardware or signal-related.
How to run the OSD test:
Most monitors have a button cluster on the front or side. Press the menu button to bring up the OSD. Navigate to a settings submenu and observe the line carefully while the menu is displayed.
Reading the results:
If the line appears over the top of the OSD menu — the menu text covers the line and the line is visible through the menu background — this means the issue is inside the display panel itself. The panel's internal circuitry is generating the line, regardless of what image signal is being received. This rules out cables and graphics cards and points directly to the T-Con board, ribbon cables, or panel damage.
If the line does not appear over the OSD menu — the menu displays cleanly without any line crossing it — this means the monitor's panel is healthy and the problem is external. The line is being generated by the video signal, which means the cable, graphics card, or driver is the cause.
This single test from manufacturer support pages such as ViewSonic's diagnostic guide narrows the problem to one of two categories instantly, saving hours of unnecessary troubleshooting.
How Manufacturers Define Acceptable Line Defects
Manufacturers do not publish exact failure rates, but repair communities such as iFixit and Reddit frequently report that display line issues account for a significant portion of monitor warranty claims. Understanding how manufacturers classify these defects helps you determine whether your monitor qualifies for a free replacement.
ISO 13406-2 standard:
The ISO 13406-2 standard defines acceptable pixel and line defects for flat-panel displays. Under this standard, a display is classified into one of four "fault tolerance" classes. Class I displays allow zero dead pixels or lines; Class IV allows up to a defined number per million pixels. Most consumer monitors fall under Class II, which permits a small number of permanently illuminated or dark pixels but is stricter about lines that span the full width or height of the display.
Manufacturer-specific policies:
- Dell Premium Panel Exchange: Dell monitors sold with Premium Panel Support qualify for a free panel replacement if even one bright pixel defect is found within the first year. For lines, Dell typically covers column or row defects that span more than 3 pixels in width under the same policy.
- HP Pixel Defect Policy: HP defines a "pixel defect" as a sub-pixel failure. A full vertical or horizontal line of dead pixels is treated as a single defect cluster rather than multiple individual pixel failures, which may qualify it for replacement under the standard warranty.
- Apple: Apple monitors and displays sold with AppleCare+ cover any bright or dark pixel defect, including lines, for the duration of the plan. Standard AppleCare covers persistent lines that appear within the warranty period.
If your monitor is under warranty, document the line with the screen test tool before contacting support. A photograph showing the exact line position on a solid colour background strengthens your warranty claim.
Laptop vs Desktop Monitor: Different Line Patterns and What They Mean
Laptop displays and standalone monitors share many of the same underlying technologies — LCD panels, T-Con boards, ribbon cables — but the form factor differences create distinct failure patterns that affect both the cause and the fix.
Laptop-specific vulnerabilities:
The hinge is the primary culprit for laptop display lines. The eDP ribbon cable runs through the hinge assembly, bending every time the laptop opens and closes. Over months or years, the repeated flexing causes microscopic cracks in the cable's conductors. These cracks typically manifest as thin vertical lines that appear intermittently or worsen near a specific screen position. Pressing on the base near the hinge or opening the lid to a specific angle may make the lines flicker or disappear temporarily.
Laptop displays also use integrated T-Con boards that are often combined with the timing control on the same PCB as the display interface. This makes T-Con replacement on laptops more involved than on standalone monitors, and the part costs are often bundled with the panel.
Desktop monitor specific vulnerabilities:
Desktop monitors are not subject to hinge flex, which eliminates the most common laptop failure mode. However, desktop monitors are more likely to develop lines due to thermal stress over time. A monitor left running 12–16 hours per day accumulates thermal cycles that stress solder joints on the T-Con board. This is why T-Con failure is more common in monitors older than two years, regardless of how carefully they are used.
Desktop monitors also have longer internal signal cables running from the main board to the panel, and these can shift if the monitor is moved frequently.
For both:
The diagnostic steps are identical: OSD test first, then cable swap, then T-Con board replacement. But on laptops, internal ribbon cable replacement requires more careful disassembly, and finding the exact eDP cable model for your specific laptop make and generation is more challenging than ordering a generic T-Con board for a common monitor size.
When to Claim Warranty vs Pay for Repair
The decision between filing a warranty claim and paying out of pocket depends on three factors: the monitor's age, the repair cost, and whether the line appeared gradually or suddenly.
Claim warranty if:
- The monitor is still within its original warranty period (typically one to three years for consumer monitors)
- The line appeared without any physical trigger — no bumps, no movement, no cable changes
- The line is perfectly stable and does not flicker, which is typical of panel-level or T-Con failure
- The monitor has special characteristics that are hard to replace, such as a specific colour calibration, high refresh rate, or unusual panel type
Pay for repair if:
- The warranty has expired but the repair cost is less than 50% of the monitor's current replacement value
- The line appeared after moving the monitor or laptop, pointing clearly to a cable issue that a simple fix can resolve
- The T-Con board is the culprit (the most common and affordable fix at $15–$50 for the board itself)
- You have already ruled out all external factors (cables, GPU, drivers)
Do not claim warranty and do not repair if:
- The monitor is more than five years old and the repair involves panel replacement
- Multiple problems coexist — lines, dead zones, backlight bleed, and colour uniformity issues all together — indicating the panel is uniformly degraded
- The repair cost exceeds half the price of a comparable new monitor
In that case, budget for a replacement and use the screen test tool to verify the new monitor has no line defects before the return window closes.
Maintenance and Prevention — How to Extend Your Monitor's Lifespan
Preventive measures can help delay or prevent monitor line problems:
Cable care:
- Avoid sharp bends in internal ribbon cables
- Do not move your monitor unnecessarily
- Use cable management to reduce strain
Temperature management:
- Ensure your monitor has adequate ventilation
- Avoid direct sunlight
- Clean the ventilation openings regularly
Software care:
- Update your graphics drivers regularly
- Avoid GPU overclocking
- Monitor GPU temperature
Physical caution:
- Do not touch the screen with sharp objects
- Do not use aggressive cleaners
- Protect the monitor from impacts and vibrations
Related Monitor Line Problems
Our guides cover every specific type of monitor line:
- Vertical and Black Lines on Monitor: Covers vertical lines, black vertical lines, and small black lines
- Coloured Lines on Monitor: Covers green lines, red lines, purple lines, and pink lines
- Horizontal Lines on Monitor: Covers all horizontal line types
- White and Static Lines on Monitor: Covers white lines and static-like interference
Related Display Issues
Monitor lines can be confused with other display problems. Explore these related guides:
- Black Line on Screen: Thin black lines across your screen — distinct from vertical lines, though causes often overlap
- Green Line on Screen: Persistent green lines — related to coloured line issues
- White Line on Screen: Bright white lines — shares causes with static and white line problems
- Dead Pixel: Individual stuck or dead pixels that may appear as tiny lines
- Dead Line of Pixels: A line of dead pixels that looks similar to hardware lines
- Screen Flickering: Flickering sometimes accompanies line problems — both stem from cable or panel issues
Conclusion
Monitor lines — whether vertical, horizontal, coloured, or static — share common underlying causes related to panel circuitry, ribbon cables, and signal transmission. Start by using our screen test tool to identify the exact type of line. Work through the diagnosis: test on a different device, try a different cable, then open the monitor to check internal cables and the T-Con board. Most monitor line problems cost $15–$50 to fix with a T-Con board replacement. Only replace the panel if the repair cost exceeds 50% of the monitor's current value.