Black spots on screen are most commonly caused by dead pixels — a permanent hardware failure that cannot be resolved with software. But understanding whether your black spot is a dead pixel, pressure damage, or a backlight issue tells you exactly what your options are. This guide covers diagnosis, testing, and next steps.
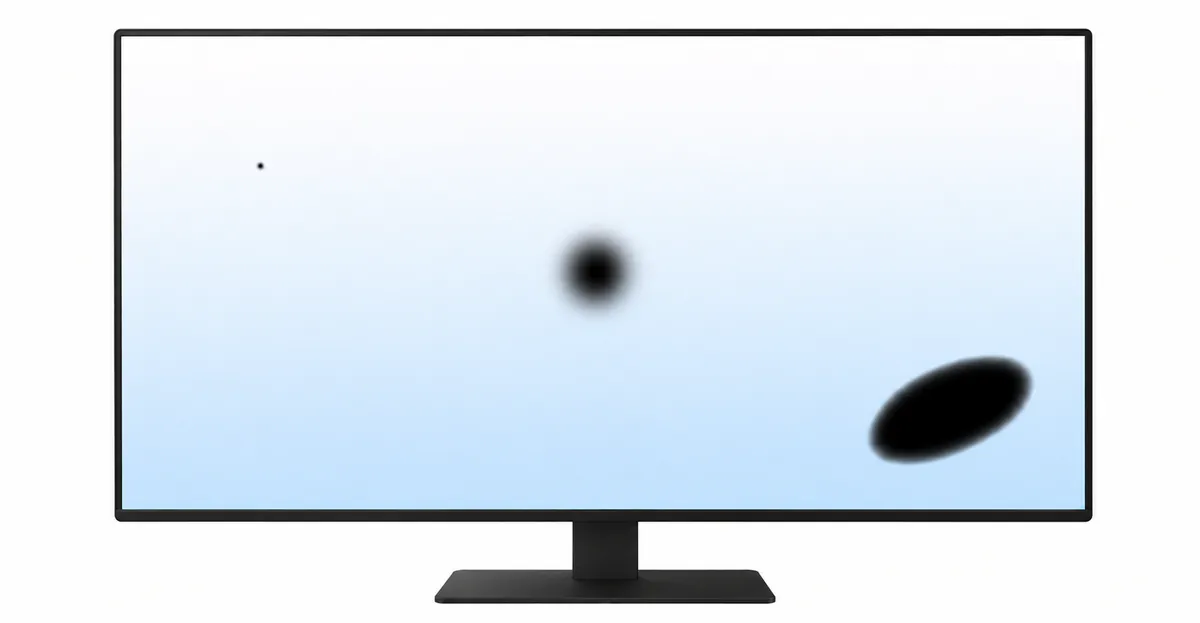
Black Spots on Screen: Causes, Diagnosis & Solutions (2026)
A black spot on screen is an area that remains dark regardless of what is displayed. Unlike bright spots or white spots that glow, a black spot produces no light at all. The most common cause of a black spot is a dead pixel — a single pixel whose electronics have completely failed.
Black spots can appear on any screen type: laptops, desktop monitors, tablets, and smartphones. You might notice them as:
- A small black dot on your MacBook screen that never changes
- Black spots on an HP laptop screen that appear after closing the lid
- A single black spot on your phone screen that stands out against light backgrounds
- Dark patches on a computer monitor that persist regardless of content
Not Sure What Type of Spot You Have?
Before diving deeper, let us help you narrow down exactly what you are dealing with. The right diagnosis depends on what your spot looks like:
| If your spot looks like... | It is most likely... | Learn more |
|---|---|---|
| A small dot that does not change | Dead Pixel | Dead Pixel Guide |
| A bright or glowing patch | LCD Bright Spot | LCD Bright Spots |
| A white spot on your phone | Mobile White Spot | Mobile White Spots |
| A line across the screen | Dead Pixel Line | Dead Pixel Line |
This page focuses specifically on black spots — permanently dark areas that do not produce light.
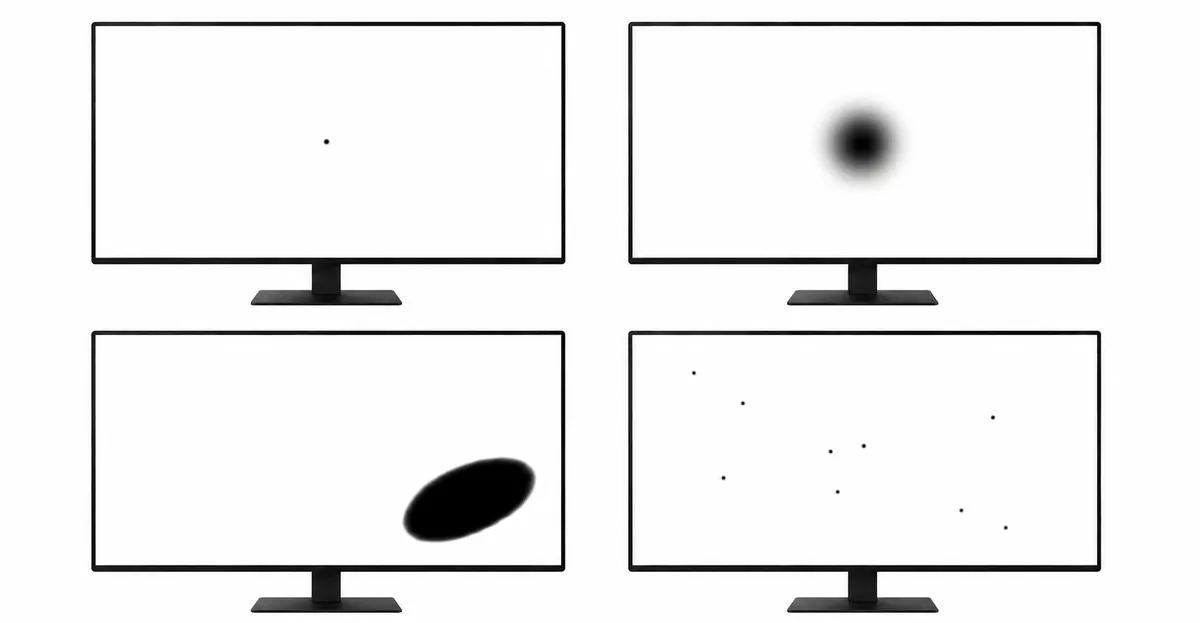
Common Causes of Black Spots on Screen
Understanding what causes black spots helps you determine the best course of action.
Dead Pixels
The most common cause of a black spot is a dead pixel. A dead pixel is a single pixel on an LCD or OLED display that has completely stopped functioning. It produces no light at all, appearing as a tiny black dot that remains permanently dark.
Dead pixels occur when the thin-film transistor (TFT) controlling that specific pixel fails. Without the electrical signal needed to control the liquid crystals (in LCDs) or the organic LEDs (in OLEDs), the pixel cannot display any color or light.
Physical Pressure Damage
Black spots can also appear from physical damage to the display panel. When strong pressure is applied to an LCD screen, it can damage the internal layers and cause localized failures. This type of damage is common when:
- Closing a laptop with an object on the keyboard
- Accidentally pressing too hard on the screen
- Dropping or impacting the device
Backlight Issues
In some cases, black spots may indicate localized backlight failure. If the backlight behind a specific area of the screen is not functioning, that area will appear dark regardless of the displayed content.
Black Spots on Different Devices
Black Spot on Mac Screen
If you have a black spot on your Mac screen, you are not alone. MacBook screens are particularly susceptible to dead pixels and pressure damage due to their thin profiles and the way they close. A black spot on a Mac screen is most commonly a dead pixel that appeared either from manufacturing defects or physical pressure.
Apple has specific warranty policies regarding dead pixels. Check if your Mac is still under warranty — Apple may replace the screen at no cost if the number of dead pixels exceeds acceptable thresholds.
Black Spot on Dell Laptop Screen
Dell laptop screens commonly develop black spots from dead pixels or pressure damage. Whether you have a Dell XPS, Inspiron, or Latitude, black spots can appear at any time during the device lifecycle. If your Dell laptop screen has black spots, using a screen test tool can help you confirm whether it is a dead pixel.
Black Spots on HP Laptop Screen
HP laptops can develop black spots for the same reasons as other brands: dead pixels, physical damage, or backlight issues. HP screens are found in various models from Pavilion to EliteBook series, and each can potentially develop these defects. Use the screen test tool to check if your HP laptop has black spots.
Black Spot on Computer Monitor
Desktop computer monitors are not immune to black spots. External monitors can develop dead pixels, pressure marks, or backlight issues just like laptops. A black spot on your computer monitor may be more noticeable due to the larger screen size.
Black Spot on Phone Screen
Mobile phones can develop black spots from dead pixels, physical damage, or internal component failures. A black spot on your phone screen may appear after dropping the device or may develop from a manufacturing defect. The small screen size makes these spots particularly noticeable.
Black Spots on MacBook Screen
MacBook screens in particular are known for developing black spots due to their Retina displays. These high-resolution screens have millions of pixels, and even a single dead pixel can be noticeable. Many MacBook users search for solutions to black spots on MacBook screens.
How to Test for Black Spots
The most effective way to detect and confirm black spots is using a screen test tool with solid color backgrounds:
- Open the Screen Test Tool on your device
- Display solid white background — a black spot will be clearly visible as a dark area
- Display solid red, green, and blue backgrounds — the black spot remains dark against any color
- Display black background — the spot becomes nearly invisible (which actually confirms it is a dead pixel, not stuck)
Look for an area that remains permanently dark regardless of the displayed color. A true dead pixel will appear as a small, isolated dark spot that does not change with content.
Can Black Spots Be Fixed
Unfortunately, most black spots caused by dead pixels cannot be fixed through software methods. Here is what you need to know:
What Does Not Work
- Pixel-fixing apps: These tools cycle through colors rapidly and can sometimes fix stuck pixels, but they cannot revive a dead pixel whose electronics have completely failed.
- Screen massage: There is no evidence that applying pressure to a dead pixel fixes it. In fact, pressure risks causing additional damage.
- Software updates or drivers: Dead pixels are hardware failures, not software issues.
What Actually Works
- Professional repair: If your device is under warranty, contact the manufacturer for a free screen replacement.
- Third-party repair: A professional technician can replace the display panel for a fee.
- Living with it: If the black spot is in an edge area of the screen and does not interfere with your work, you may choose to simply ignore it.
What to Do When You First Notice a Black Spot
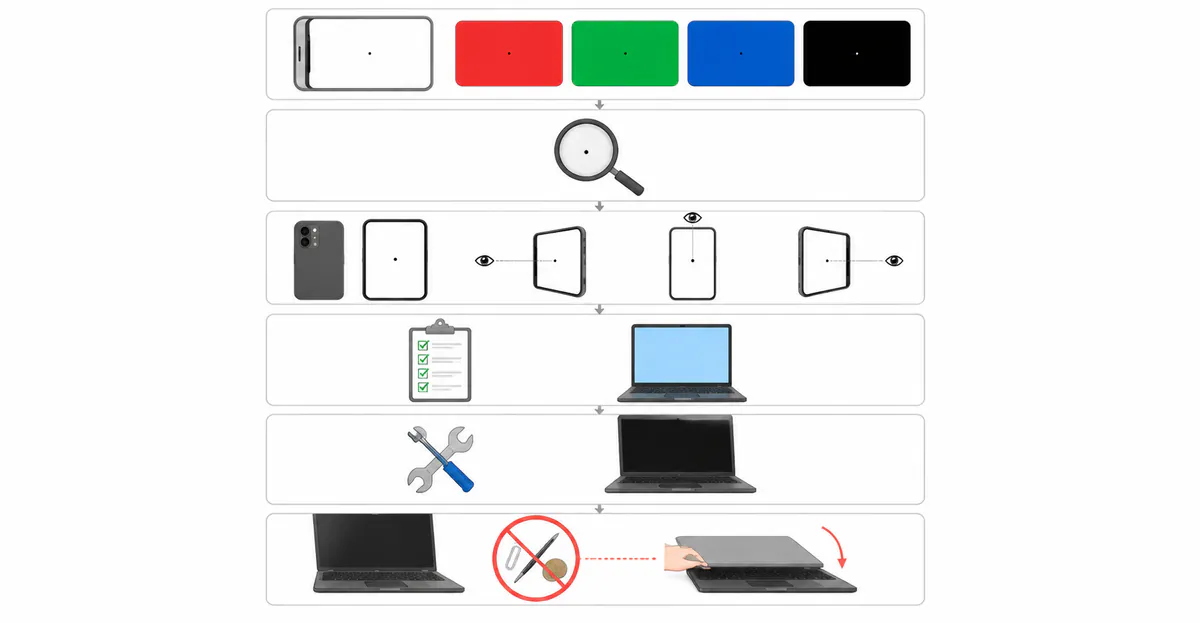
The first hour after noticing a black spot matters more than you might think. A few quick actions help establish whether the issue is going to worsen or stay stable.
Step 1: Run the screen test immediately. Open the screen test tool and cycle through solid white, red, green, blue, and black. Photograph each color with the spot clearly visible. These photos become your baseline for tracking whether the spot spreads over time.
Step 2: Check for pressure marks. If the spot is larger than a few pixels, run your finger (gently) along the edges of the spot. Pressure damage has a soft, fuzzy border where the diffuser layer has been compressed. Dead pixels have a sharp, well-defined boundary at exactly one pixel.
Step 3: Document everything. Note the spot's location, approximate diameter, and the date you first noticed it. Record whether it appears on every color background or only on light backgrounds. This information is essential if you decide to file a warranty claim or seek repair.
Step 4: Stop pressing on the screen. If the spot is from pressure damage, additional pressure will not fix it — it will make the affected area larger. Avoid cleaning with pressure, closing the lid with objects on the keyboard, or stacking items on top of the device.
Step 5: Photograph the spot under multiple angles. Use a smartphone camera and capture the same spot from straight-on, slightly left, and slightly right. Pressure marks and backlight patches often change shape as the viewing angle changes; dead pixels do not. Angle photographs are extremely useful evidence when filing a warranty or insurance claim, because they help a remote support technician tell the defect types apart without seeing the panel in person.
Step 6: Capture the serial number and proof of purchase. Locate your device serial number through Settings → General → About (Apple), through HP Support Assistant (HP), or by reading the sticker under the battery on most Windows laptops. Save the original receipt, the box, and any warranty card in a single folder so they are ready to attach when you contact support. Repair communities such as iFixit and Reddit frequently report that claims with photos, serials, and receipts are approved faster than claims without documentation.
How Manufacturers Define Acceptable Defect Thresholds
Most display manufacturers do not guarantee a defect-free panel. They publish a written pixel policy that specifies how many dead, bright, or stuck sub-pixels a panel can have and still be considered within specification. Understanding these thresholds tells you whether a single black spot already qualifies for warranty replacement — or whether you are expected to live with it.
The reference framework many manufacturers use is ISO 13406-2, an ergonomic standard for flat-panel displays. It defines four panel classes. Class I is defect-free; Class II allows a small number of defects per million pixels; Class III and Class IV allow progressively more. As of 2007, most consumer monitors on the market are sold as Class II. Under Class II, a panel with about 2 million pixels (a typical 1080p display) can carry up to 2 hot pixels, 2 fully dead pixels, and 5 stuck sub-pixels before the manufacturer is contractually obligated to replace it. A single black spot, in isolation, almost always falls below that threshold.
Manufacturers do not publish exact failure rates, but repair communities such as iFixit and Reddit frequently report that policies vary widely by brand:
- Dell follows ISO 9241-307 Class II on standard monitors, where one isolated dead pixel is usually not enough for replacement. On UltraSharp and other professional models enrolled in the Premium Panel Exchange, even one bright pixel qualifies for replacement — but the policy distinguishes between bright pixels and dead pixels, and dark dead pixels are not covered under PPG unless they accumulate.
- HP historically maintains stricter specifications than the basic ISO Class II requirement. HP pixel-defect documentation for flat-panel monitors states that no full-pixel defects are ever permitted on HP panels, and no double sub-pixel defects, and no sub-pixel defects spaced closer than 15 mm. The HP specification effectively means most HP displays meet or exceed ISO Class I even though they are marketed as Class II.
- Lenovo, Acer, and ASUS generally follow ISO Class II on consumer monitors. Some Lenovo product lines add vendor-specific overlays, but the base allowance is similar.
- Apple does not publish a public pixel policy. In practice, support communities report that Apple typically replaces a MacBook or iMac display only when the defect count is visible enough to interfere with normal use or when a single defect sits in the central viewing area.
Because the rules differ by product line, the safest move is to check your specific model’s support page before assuming you have a claim. If you are still inside the retailer’s return window — typically 14 to 30 days — that path is faster than a manufacturer warranty claim and applies regardless of pixel count.
OLED vs LCD Black Spots: Differences That Matter
Black spots look similar across both panel types, but the underlying failure modes are not the same. Knowing whether your device uses LCD or OLED changes which fixes are even worth trying.
On an LCD panel, a black spot can be one of three things: a single dead pixel, a localized backlight failure, or pressure damage to the diffuser layer. LCDs need a backlight because each pixel is only a colored shutter; when the thin-film transistor controlling a pixel fails, the liquid crystal defaults to its closed position and the backlight is blocked in that one spot. The result is a sharp, pixel-exact black dot. When a section of the LED backlight fails instead, the dark area is larger and shaped like the dead LED zone. When the diffuser is compressed, the area looks bruise-like and shifts with viewing angle.
On an OLED panel, every pixel is its own light source. There is no backlight, so the failure modes are different. An OLED black spot is almost always either a fully dead organic emitter or physical damage to the front glass. Partial OLED failures tend to produce stuck pixels in a single bright color rather than black, because the organic material degrades unevenly. Truly dead OLED pixels — where the emitter or its driver circuit has failed completely — are rarer on OLED than on LCD, but when they occur they look identical to LCD dead pixels: a permanent dark dot, visible on every background.
The practical implications:
- The flashlight test only works on LCD. Power the screen off, then shine a flashlight at the surface. If you can see a faint image of the desktop through the dark area, the panel itself is fine and the backlight has failed. On OLED, this test is meaningless because there is no backlight to fail.
- Pixel-fixing apps are slightly more useful on OLED. Rapid color cycling can occasionally recover stuck sub-pixels on OLED because the stuck state is not always a complete physical failure. On LCD, the transistor has either failed or it has not — software cannot revive a failed transistor.
- OLED black spots rarely spread into patches. LCD black spots from backlight failure can grow over time as more LEDs die. OLED black spots tend to stay isolated unless the underlying defect is a manufacturing issue that affects a region.
- Burn-in is an OLED-only risk that does not produce black spots. Burn-in appears as a faint but fixed image of a static UI element — a taskbar, a navigation bar, a channel logo. It is the opposite symptom of a dead pixel: the area is permanently bright, not permanently dark.
If you are not sure which panel technology your device uses, the device model number and year are usually enough. iPhones from the X onward, all modern Apple Watch models, most flagship Samsung Galaxy phones, and most OLED TVs from LG, Sony, and Panasonic use OLED or AMOLED. Most laptops and most desktop monitors still ship with LCD (IPS, VA, or TN) panels, although premium laptop lines (Dell XPS OLED, Lenovo ThinkPad with OLED option, Razer Blade, ASUS ZenBook with OLED) increasingly offer OLED.
Repair Cost Ranges by Device Type
Knowing the realistic price band for repair helps you decide whether to claim warranty, pay for third-party repair, or live with the spot. These ranges are pulled from public repair-shop pricing pages, manufacturer service estimates, and consumer repair guides published in 2026; they reflect out-of-warranty costs in the absence of an active Premium Panel Exchange, AppleCare+, or accidental-damage coverage.
MacBook (Apple)
Apple does not perform component-level screen repairs — it replaces the entire display assembly. Out of warranty at an Apple Store, a MacBook screen repair typically costs between $450 and $1,100 USD (£400–£900 GBP, $579–$799 CAD), depending on model. MacBook Air M1/M2/M3 sits on the lower end ($450–$579); MacBook Pro 14-inch and 16-inch with Liquid Retina XDR sit on the upper end ($699–$1,100+). AppleCare+ caps the cost at a flat excess fee of roughly $99 USD or £79 GBP per incident. Independent repair shops typically charge 30–50% less than Apple, ranging from $200 to $750 USD depending on tier, and some shops can replace only the LCD panel while keeping the housing, which can save another 40–60%.
Windows Laptops (Dell, HP, Lenovo, ASUS, Acer)
Manufacturer out-of-warranty service for a full display assembly on a mainstream laptop typically costs $200 to $450 USD. Premium lines (Dell XPS, HP Spectre, Lenovo ThinkPad X1 Carbon) run higher, $350 to $700. Third-party shops in major markets (US, UK, EU) commonly charge $120 to $300 for an equivalent replacement. On older laptops where the panel is sold as a standalone part, an experienced technician can replace only the LCD and reuse the existing housing for $80 to $200 USD. Out-of-warranty pricing varies by region; always request a written diagnostic before authorizing work — a loose display cable can mimic a dead-pixel panel and costs only $50 to $150 to reseat.
External Desktop Monitors
Most consumer monitors are not worth repairing once the warranty has expired. A replacement 24-inch 1080p IPS monitor costs less than a typical third-party repair quote. Premium monitors (Dell UltraSharp, LG UltraFine, ASUS ProArt, EIZO) are worth repairing through the manufacturer’s service channel because the panel alone costs more than a comparable new consumer display. Repair quotes on these models run $250 to $600 USD depending on panel size and whether the backlight assembly or the full LCD must be replaced.
Phones and Tablets
iPhone screen replacements at an Apple Store or authorized provider cost $199 to $329 USD depending on model. Samsung Galaxy screen replacements run $219 to $289 USD for flagship models. Independent shops typically charge $100 to $200 less. On phones, a black spot is rarely a single dead pixel — most are pressure damage from a drop or a localized LCD failure under the glass. The repair path usually replaces the entire front assembly.
Budget Guidance
A useful rule of thumb: if the repair quote is more than 50% of the device’s current resale value, replacement is usually the better financial decision. For a $1,000 laptop with a $500 screen quote, replacement of the device may be more cost-effective. For a $2,500 MacBook Pro with a $700 Apple quote, repair is almost always worth it.
Real-World Case Study: MacBook Air 2018 Black Spot
Repair communities such as iFixit and Reddit frequently report an issue affecting MacBook Air 2018 units: a black spot appearing near the bottom edge of the screen, often in the lower-left or lower-right corner. Owners typically first notice the spot months after purchase, and it gradually grows over weeks. iFixit teardowns of affected units consistently identify the cause as pressure damage to the backlight diffuser from a single point of impact — frequently from closing the lid with a small object between the keyboard and screen. Because the damage is in the backlight layer rather than the LCD matrix itself, replacement requires a complete display assembly swap. AppleCare+ typically covers the repair; out of warranty, third-party panel replacement costs roughly $150-250 depending on the supplier. The case study reinforces the most common prevention message: never close a laptop with anything on the keyboard.
When to Seek Professional Help
Consider professional repair or replacement when:
- The black spot is located in your primary viewing area
- You have multiple black spots on the screen
- The spot is growing or spreading over time
- The device is still under warranty
- The spot appeared after physical damage and may worsen
How to Prevent Black Spots
Prevention is the best strategy for protecting your screen:
- Avoid putting pressure on your screen — do not press hard when cleaning
- Close your laptop gently and ensure nothing is on the keyboard
- Use a protective case for your phone and tablet
- Handle your devices carefully to avoid impacts
- Test new devices before the return window expires
Related Screen Issues
Black spots are just one type of screen issue. Understanding the differences helps you find the right solution:
- Dead Pixel: Learn more about permanently dark pixels and how to test for them
- Black Line: A thin black line across your screen — different from black spots
- LCD Bright Spots: Bright glowing areas that are the opposite of black spots
- White Spot LCD: White spots specifically on LCD monitors and laptops
- Mobile White Spots: White spots on phone screens and mobile devices
- LCD Spot Damage: Physical damage to the display panel
- Screen Test Tool: Test your screen to diagnose spots and defects
See also: Blue Spots on Screen — blue-tinted screen spots caused by sub-pixel transistor failure, a lesser-known defect that is distinct from black spots and bright spots.
See also: Green Line on Screen — persistent green lines across your screen, a related display defect to black spots caused by similar hardware failures.
- Orange Screen on Laptop: Persistent orange tint on your display — cable, calibration, or hardware issue
Conclusion
Black spots on screen are most commonly caused by dead pixels — individual pixels that have completely stopped producing light. While dead pixels cannot be fixed through software methods, understanding the issue helps you determine whether repair, replacement, or simply living with the spot is the right choice for your situation. Use the screen test tool to confirm whether your black spot is a dead pixel and track your screen's condition over time. If your device is under warranty, contact the manufacturer for potential free replacement.