Green tint on a monitor is one of the most common display color problems — and one of the most fixable. Most cases stem from a handful of causes that are straightforward to diagnose and resolve at home.
How to Fix Green Tint on Monitor: Causes & Solutions (2026)
What Green Tint Actually Means
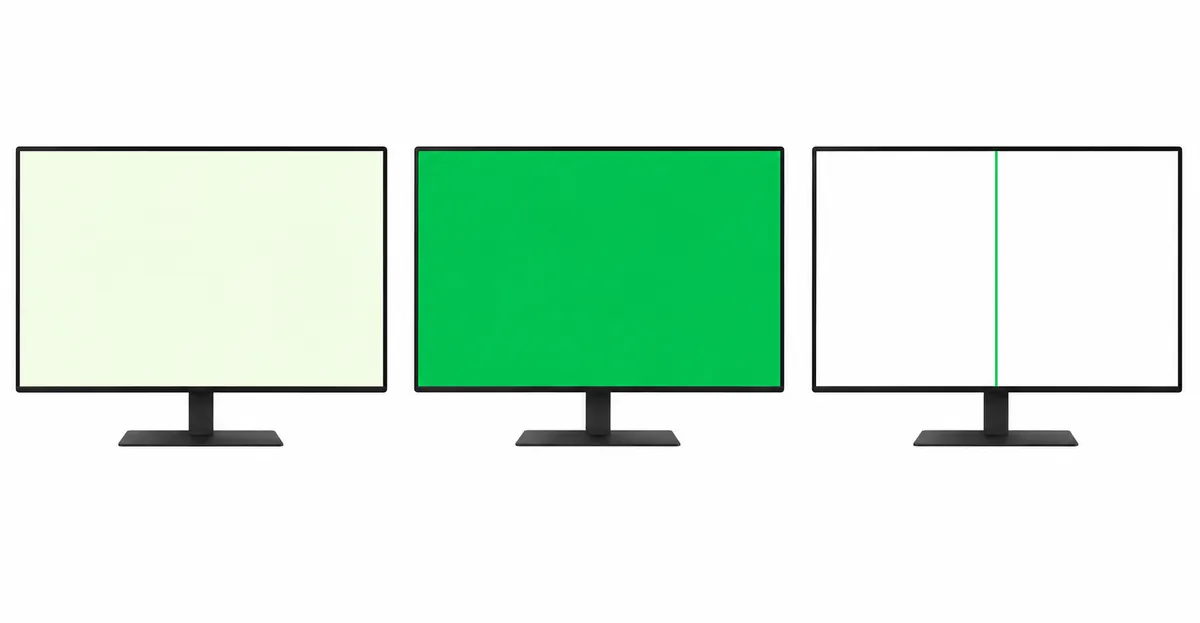
Green tint occurs when the red and/or blue color channels are reduced or lost, leaving green disproportionately dominant. The entire screen takes on a greenish or yellowish-green hue. On white backgrounds, this appears as a pale green or yellow-green shimmer.
The physics: LCD displays create colors by mixing red, green, and blue sub-pixels. When red and blue channels are reduced, green dominates — creating the greenish cast.
Key distinction from other issues:
- Green tint: entire screen has a greenish cast
- Green screen: everything is completely green (severe signal failure)
- Green lines: specific vertical or horizontal lines are green (different problem)
The #1 Cause: Cable Problems
Loose or damaged display cables account for the majority of green tint cases.
Why cables cause green tint: Modern cables (HDMI, DisplayPort, DVI) carry all three color channels digitally. If the cable connection is compromised — loose connector, damaged conductors, poor shielding — one or more channels may degrade. The green channel often survives better than red and blue, leading to green dominance.
Signs your cable is the cause:
- Tint changes when you move or reseat the cable
- Tint appears only with certain cable positions
- Tint is intermittent or comes and goes
- A different cable eliminates the tint
The fix: Reseat the cable firmly at both ends. If the cable is old or damaged, replace it. HDMI cables are inexpensive — a new 6-foot cable costs $5-15.
Why Graphics Drivers Cause Green Tint
Graphics drivers process color data before sending it to the monitor. A corrupted, outdated, or incompatible driver can corrupt color channel data — often manifesting as green tint.
Signs driver-related green tint:
- Tint appeared after a driver update or system update
- Tint changes when you adjust display settings
- A different monitor still shows green tint with the same computer
The fix: Update to the latest graphics drivers from NVIDIA, AMD, or Intel. If the tint appeared after a recent update, roll back to the previous driver version.
The Color Channel Settings Trap
Your graphics control panel allows manual adjustment of individual color channels. If the green channel is set above 100%, or if red and blue are set below their defaults, green tint results.
How to check:
- NVIDIA: NVIDIA Control Panel → Adjust desktop color settings → Brightness/saturation
- AMD: AMD Radeon Settings → Display → Color
- Intel: Intel Graphics Command Center → Color
The fix: Reset all color channels to their default values (100% or 0 offset).
When Hardware Is Actually the Cause
In a minority of cases, green tint originates from hardware:
1. Aging CCFL backlight (older monitors) CCFL monitors use fluorescent backlights with blue and red phosphor coatings. As the red phosphor degrades faster than green, the backlight shifts toward green over time.
2. T-con board malfunction The timing controller processes color signals. If the red/blue channel processing circuits fail, green can dominate the output.
3. Panel-level failures Internal color processing circuits within the LCD panel itself can fail, causing channel imbalance.
Signs of hardware cause:
- Tint is permanent and unchanging
- Tint persists across multiple computers and cables
- Tint persists in BIOS or safe mode
- Tinting appeared suddenly after a power surge or physical impact
Step-by-Step Diagnosis
Step 1: Try a different cable This rules out cable issues in minutes. A $5 HDMI cable can eliminate green tint caused by a damaged cable.
Step 2: Check graphics settings Reset color channels to defaults. Update or roll back drivers.
Step 3: Test on another computer If the tint persists on a different computer with a different cable, the monitor hardware is at fault.
Step 4: Use screen color tests Open the screen test tool and display pure red:
- If red appears orange or greenish: red channel is weak
- If pure red displays cleanly: software/settings issue
Step-by-Step Fix Guide
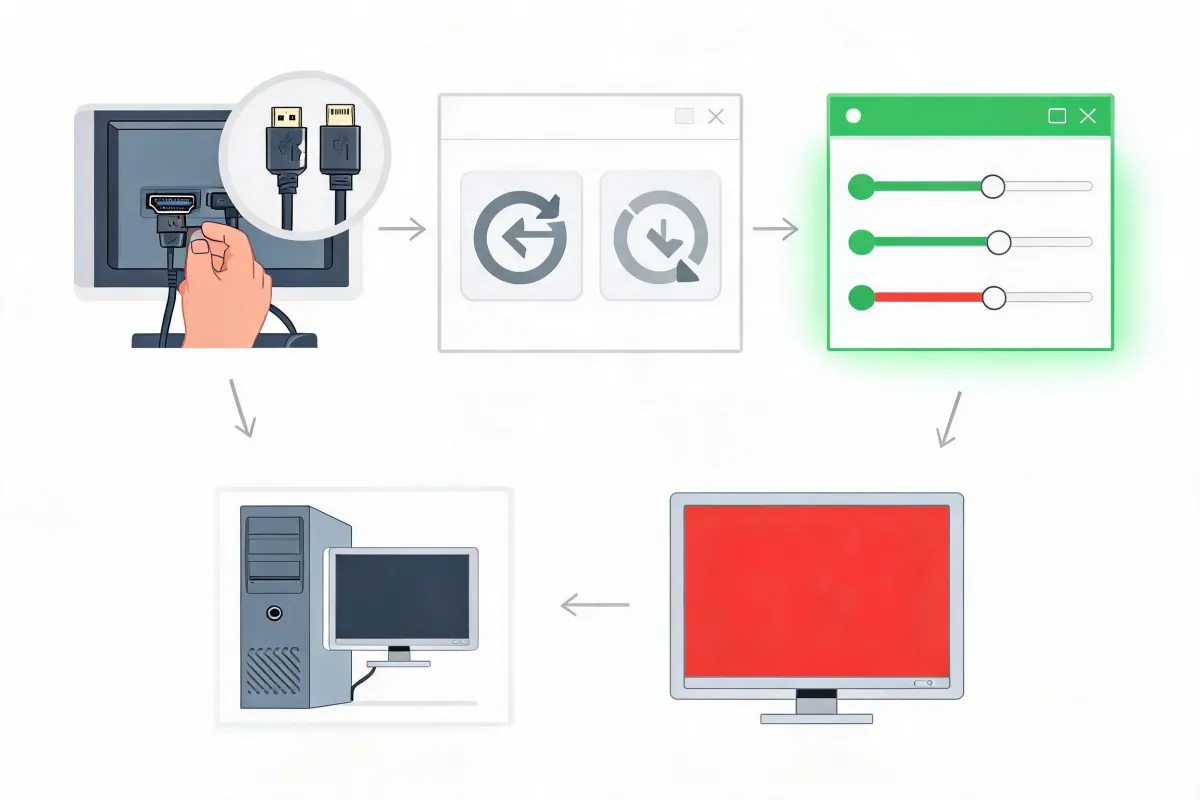
Fix 1: Cable Reseat or Replacement
- Unplug the cable from both monitor and computer
- Inspect connectors for bent pins or damage
- Reconnect firmly
- If available, try a different cable type (HDMI vs. DisplayPort)
- Replace old cables — they degrade over time
Fix 2: Graphics Driver Update/Rollback
- Open Device Manager → Display adapters
- Right-click graphics card → Update driver
- Download latest drivers from NVIDIA/AMD/Intel if needed
- If tint appeared after recent update: Roll back driver
Fix 3: Color Channel Reset
- Open graphics control panel (NVIDIA/AMD/Intel)
- Navigate to color adjustment settings
- Reset all channels to 100%/default
- Disable any custom color profiles
Fix 4: Professional Repair
If all software fixes fail:
- T-con board replacement: $25-80
- Panel replacement: $100-300
- External monitor (for laptops): often most practical
The EMI Factor
Electromagnetic interference from nearby devices can cause color tinting — including green. Speakers, routers, and power supplies near your monitor cables can introduce signal noise.
The fix: Route cables away from power cords and electromagnetic sources. Use cables with better shielding for longer runs.
Case Study: Diagnosing Green Tint on an ASUS VG248QE
The ASUS VG248QE is a textbook example of green tint that looks like a hardware problem but is actually factory calibration. Out of the box, the monitor's TN panel ships with a cool, greenish tint that has been documented by reviewers at PC Monitors, Tom's Hardware, and DisplayNinja. Many users mistake this default appearance for a defect.
The diagnosis narrative: A user reports that their VG248QE has a green tint on white backgrounds, particularly in productivity apps. The tint is constant, present on multiple computers, and unaffected by cable reseating. By every textbook rule, this should be a panel problem.
The actual cause: The monitor's factory white-point is set cooler than the sRGB standard. The green channel gain is set higher than red and blue. This is a calibration choice, not a defect — though it is a poor one.
The fix: Open the OSD (On-Screen Display), choose User Mode under Color Temperature, and set the RGB values to Red 96, Green 94, Blue 88. Install the ICC profile shipped on the ASUS driver CD (or download the NVIDIA/AMD-tuned ICC profile from DisplayNinja). After these adjustments, the green tint disappears and the panel calibrates to an average Delta E of 0.6 — essentially neutral.
The lesson: Before assuming hardware failure, check whether the manufacturer's known calibration quirks explain the symptom. The VG248QE's green tint is a calibration issue, not a broken monitor.
Case Study: Dell S2719DGF — The Persistent Factory Green
The Dell S2719DGF is a 27-inch 155 Hz TN gaming monitor that has shown a known green-tilt out of the box. PC Monitors' review explicitly notes that the unit they tested had "a cool and somewhat green tint" with default settings, and Tom's Hardware observed a green shift at off-axis viewing angles up to 40 percent brightness reduction. Multiple buyers on RTINGS and OzBargain have reported the same.
The diagnosis narrative: A buyer unboxes the S2719DGF, connects it via DisplayPort, and immediately sees a greenish cast on white backgrounds. They try a different cable, another computer, and a factory reset — the green tint remains. By the diagnostic framework above, the monitor looks broken.
The actual cause: The TN panel's default Custom Color mode ships with green gain set near 100% and red/blue at lower values. For some units, the panel's native white point also skews cool. The green tint is a calibration artifact, not a failure.
The fix: Open the OSD, switch to Custom Color, and lower the green gain to approximately 80 percent while leaving red and blue at 100. Alternatively, use the preset RGB values suggested by RTINGS and reviewers: R 95, G 94, B 100. Disable the built-in ComfortView low-blue-light mode — it has been observed to add its own green cast on top of the default tint. Apply the ICC profile from RTINGS' database for full correction.
The lesson: TN panels more commonly ship with green-leaning factory calibration than IPS or VA. If your monitor is a TN model and the green tint is present from the first boot, calibration is the first thing to try, not a repair.
Case Study: LG 32GK650F-B Logic Board Failure
Not every green tint is a calibration quirk. The LG 32GK650F-B has well-documented logic board failures that can produce green tint alongside other symptoms. Badcaps Forums and Reddit threads describe the same part number — EAX69731901 — failing on multiple units.
The diagnosis narrative: A user reports that the 32GK650F-B has developed a green tint and intermittent blackouts on a single frame. They swap power supplies, try three different video cables, switch inputs between HDMI and DisplayPort, and connect to three different computers. The symptoms do not change. The green tint persists across BIOS and the OSD internal test pattern — meaning the panel itself is producing the wrong color before any PC signal arrives.
The actual cause: The logic board (EAX69731901, which combines the power input, video input, OSD control, and LCD output) has failed at the component level. The most common failure mode is capacitor degradation on the DC output stage — three capacitors on the board, with two empty spots for revisions. Once the board sags, color channel processing becomes unstable and green dominates.
The fix: Replace the failed capacitors if you have soldering skills, or replace the entire logic board. Replacement boards are available on eBay and Taobao, but the older EAX67626001 board is bigger and may not fit the metal housing of newer units. The cheapest working donor monitor starts around $200 shipped, making repair the most economical option for an otherwise functional panel.
The lesson: When green tint appears suddenly, persists across all input sources and computers, and survives the OSD self-test pattern, the failure is past the cable and driver level. Run the on-screen self-test first — if green tint is visible in the self-test, the monitor's internal processing is at fault.
Why Cable Shielding Matters: A Signal Integrity View
Most green-tint cable diagnoses focus on physical damage — bent pins, loose connectors, broken conductors. The deeper issue is electrical. Modern HDMI and DisplayPort cables carry high-speed differential signals (HDMI 2.0 TMDS operates at 0.825–3.0 GHz, HDMI 2.1 reaches 6 GHz). At these frequencies, a cable is no longer a simple wire — it is a transmission line that must be properly shielded to preserve signal integrity.
Why green survives while red and blue degrade: Each color channel travels through its own set of TMDS pairs inside the cable. The green channel pair is often the most central in the cable geometry, surrounded by the most shield coverage. The red and blue pairs sit closer to the outer shield, where they are more exposed to electromagnetic noise and ground-loop interference. When the cable shield degrades — through aging, kinking, or poor manufacturing — the exposed pairs lose signal first. Green survives because it is the most protected, and the surviving green overwhelms the degraded red and blue.
What good shielding looks like: A well-shielded HDMI cable uses a triple-layer construction — aluminum foil for high-frequency EMI, a tinned copper braid with 85–100 percent coverage for low-frequency magnetic interference, and a 24 AWG drain wire to maintain ground continuity at the connector. Shield resistance measured at the connector end-to-end should stay below 10 mΩ; anything above that fails regulatory testing at frequencies above 300 MHz and begins to show as visible artifacts on the screen.
What cheap cables skip: Low-cost cables often use single-layer foil shielding, thin 28–30 AWG conductors, and skip the drain wire entirely. They pass signals correctly at 1 meter but begin to lose channels past 3 meters — exactly where green tint most often appears. Industrial and pro-grade cables (Amissiontech, Murata-recommended designs) use common-mode choke coils (CMCCs) at both ends to suppress common-mode noise by up to 47 percent.
Practical takeaway: If your green tint appears only on cable runs longer than 3 meters, the cable is the cause. Replace it with a certified Ultra High Speed HDMI cable rated for the full length, or switch to DisplayPort which has a more robust latching connector and lower EMI susceptibility for long runs.
Driver and OS Update History: Specific Known Triggers
Green tint appearing immediately after a system update is a recurring pattern with identifiable triggers. Here are the documented cases:
Windows 10 Fall Creators Update (build 1709, October 2017): NVIDIA's support database (KB 4580) documented a wave of green flashing and color corruption caused by Windows changing the default display output from 8 bpc to 12 bpc or 10 bpc. Many TVs and monitors report EDID values that overstate their actual color depth support. Once Windows started requesting 12 bpc by default, those displays produced corrupted green output. The fix at the time was to manually set Output color depth to 8 bpc in NVIDIA Control Panel. Microsoft patched the OS-side handling in later builds.
Windows 10 March 28, 2020 cumulative updates (KB4551762 + KB4537572): Reported on Windows 10 version 1909, these updates reset the default display resolution and color format. Users on LG OLED C9 and other 4K@60Hz displays found Windows defaulting to YCbCr422 at 12 bpc instead of their custom RGB/8 bpc native resolution. The result was a green tint on every cold boot that would only resolve after manually switching the color format in NVIDIA Control Panel. The workaround was to use CRU (Custom Resolution Utility) to pin the native resolution to the top of the resolution list.
NVIDIA driver 460.97 (early 2021): GTX 1080 Ti users running HDR on Windows 10 reported a persistent HDR bug where the display would come back dimmed and color-faded after waking from sleep. The workaround required disabling and re-enabling HDR each time. The bug was tracked in NVIDIA's developer forums (thread #169198) and was eventually addressed in later driver branches.
NVIDIA driver 535.x series (late 2023): NVIDIA driver 535.129.03 on Ubuntu 23.10 produced a documented purple/green tint on external monitors caused by a CTM (Color Transformation Matrix) property error. The fix was to regenerate xorg.conf with correct color management settings. The same driver branch occasionally surfaced green-tint reports on Windows systems when paired with specific monitor EDID overrides.
NVIDIA HDR + RTX 40 series (2024): DisplayCAL forum users with RTX 4070 cards reported a green tint that only manifested after waking from sleep with HDR enabled and a custom VCGT calibration loaded. The tint was invisible to screen capture tools, confirming it was a driver-side rendering issue rather than a panel output issue. The fix was to enable "Override to reference mode" in NVIDIA Control Panel under Color accuracy mode.
The general pattern: When green tint appears immediately after a Windows update or a GPU driver update, do not buy a new cable or replace the monitor. Instead, roll back the driver to the previous version. Then check the NVIDIA Control Panel (or AMD/Intel equivalent) to confirm the output color format and color depth are set correctly — RGB, 8 bpc is the safest fallback for almost all displays.
EMI Sources That Cause Green Tint (And How to Test)
Green tint from external interference is rarer than cable or driver issues, but it has a recognizable fingerprint: the tint appears and disappears based on what other devices are active nearby. Here are the most common EMI sources, with the physics behind each.
USB 3.0 and 3.2 ports: USB 3.x signaling uses a 2.5 GHz reference clock and a 5 Gbps data rate, which radiates broadband noise in the 2.4–2.5 GHz ISM band. Intel's white paper on USB 3.0 RF interference showed that the noise radiated from a USB 3.0 connector can raise the noise floor by 25 dB within a few centimeters. The 2.4 GHz band is also where Wi-Fi and Bluetooth operate, but the noise can couple into nearby display cables as well. The fix: move USB 3.0 devices away from your display cable path, switch wireless peripherals to 5 GHz Wi-Fi, and use shielded USB cables if the cable run is unavoidable.
2.4 GHz Wi-Fi routers: A router placed within a meter of an HDMI cable can couple 2.4 GHz noise into the cable's shield. The signal integrity loss tends to affect the outermost (red and blue) TMDS pairs first, producing green dominance. Switching the router to 5 GHz, or moving it at least one meter away from the display cable, removes the coupling.
Powered speakers and subwoofers: Speakers contain unshielded transformers and power supply switching circuits that radiate broadband noise. Placing a subwoofer directly next to a display cable with a poor shield can inject interference that the cable's inadequate foil cannot filter out. The fix is physical separation — at least 30 cm between the subwoofer and the cable path.
Power bricks and laptop chargers: Switching power supplies radiate at their switching frequency (typically 100–500 kHz) and at harmonics reaching into the MHz range. A 65 W laptop charger resting on top of an HDMI cable can introduce ground-loop noise that manifests as fluctuating green tint. The fix is to keep chargers and display cables on separate paths and use grounded outlets where possible.
USB-C hubs and docking stations: A poorly shielded USB-C hub can introduce both conducted and radiated EMI into a downstream display cable. If your green tint started after adding a hub, that hub is the suspect. Test by routing the display cable directly to the computer and bypassing the hub.
Diagnostic procedure: To confirm EMI as the cause, unplug all nearby USB 3.0 devices, switch Wi-Fi to 5 GHz, and move powered accessories at least one meter away from the cable. If the green tint disappears, EMI is the root cause. Reintroduce devices one at a time to identify the specific offender.
Preventive Maintenance: Cable Routing and Shielding
Once a green tint is fixed, a few low-cost habits prevent it from returning.
Separate power and signal cables: Never run an HDMI or DisplayPort cable parallel to a power cord for more than a few centimeters. Cross them at 90 degrees if you must cross them. Parallel runs couple mains-frequency interference into the signal cable.
Use the shortest cable that works: A 1.5 m cable is more reliable than a 5 m cable of the same quality. If you need a longer run, spend more on a certified cable — the per-meter cost is higher, but the signal integrity is preserved.
Replace cables every 3–5 years: Cable shielding degrades with repeated bending, heat exposure, and connector fatigue. A cable that worked perfectly when new can develop intermittent green tint after a few years of desktop use. Replace the cable before suspecting the monitor.
Avoid clipping cables to metal desk frames: A cable pressed against a metal frame can ground parts of the shield through the frame in unexpected ways, creating a ground loop. Use cable clips with rubber or plastic isolators.
Use ferrite cores only as a last resort: Clip-on ferrite cores on the outside of a cable are largely ineffective against radiated EMI above 30 MHz, because they do not pass through the magnetic core geometry correctly. If you need ferrite suppression, use integrated ferrite cores at the connector ends, or use a cable with built-in CMCCs.
Repair Cost Tiers: When Professional Help Makes Sense
When software fixes fail, the decision tree for repair is straightforward. The numbers below reflect typical 2026 North American pricing from iFixit, TV repair shops, and OEM service centers.
Tier 1: Zero-cost fixes (always try first)
- Reseat cables
- Driver update or rollback
- Color channel reset
- Factory reset via OSD
- Cost: $0
Tier 2: Cable and accessory replacement
- Replacement HDMI cable (certified Ultra High Speed, 2 m): $8–15
- Replacement DisplayPort cable (VESA-certified, 2 m): $10–20
- USB 3.0 shielded cable for nearby devices: $10–25
- Cost: $8–60
Tier 3: OEM warranty service
- If your monitor is within its warranty period (Dell premium panel guarantee is 3 years, LG premium is 2 years, ASUS is typically 3 years), contact the manufacturer. They will cross-ship a refurbished unit or repair the original for free.
- Cost: $0 (covered)
Tier 4: Out-of-warranty T-con board replacement
- T-con board part: $20–120 (OEM $45–65, refurbished $22–36)
- Labor at a repair shop: $95–140
- DIY: $20–65 + 1–2 hours of time
- Cost: $20–260 total
Tier 5: Main board replacement (when T-con is integrated)
- Many modern slim monitors (some Samsung, TCL, Hisense 2023+) integrate the T-con into the main board. If the T-con fails, the main board must be replaced.
- Main board: $110–180
- Labor: $95–140
- Cost: $205–320 total
Tier 6: Panel replacement (last resort)
- Panel replacement typically exceeds the residual value of the monitor. Industry estimates put panel replacement at $220–400 in labor and parts.
- For a monitor that cost $250–400 new, panel replacement is rarely economical.
- Cost: $220–400+
Third-party repair options: uBreakiFix, Geek Squad, and local TV repair shops handle monitor T-con swaps for $95–140 in labor on top of parts. Mail-in services like ShopJimmy and iFixit offer OEM T-con boards with installation guides. For out-of-warranty monitors under $400, third-party repair is usually the best balance of cost and reliability.
When to replace instead of repair: If the repair cost exceeds 50 percent of a new equivalent monitor's price, replace the monitor. If the monitor is older than 7 years and uses CCFL backlighting, replace it — the new LED-backlit equivalent will use less power, run cooler, and have a longer usable lifespan.
Using the Screen Test Tool for Pure-Color-Channel Isolation
The screen test tool is the fastest way to isolate which channel is failing when the green tint is subtle or intermittent. The procedure:
Step 1: Display pure red (R 255, G 0, B 0)
- If the red field appears orange or greenish: red channel is weak or green channel is over-gain
- If the red field appears neutral red: red channel is functional
Step 2: Display pure green (R 0, G 255, B 0)
- If the green field appears bright yellow: green channel is over-gain or red/blue are under-gain
- If the green field appears neutral green: green channel is functional
Step 3: Display pure blue (R 0, G 0, B 255)
- If the blue field appears pale or greenish: blue channel is weak or green is over-gain
- If the blue field appears neutral blue: blue channel is functional
Step 4: Display pure white (R 255, G 255, B 255)
- If white appears greenish: green is dominant overall — most commonly a software or calibration issue
- If white appears neutral: no dominant channel issue
Step 5: Run the test on a second computer
- If the green tint is identical on the second computer with a different cable, the monitor hardware is at fault
- If the green tint disappears on the second computer, the issue is in the original computer's driver, settings, or cable
The screen test tool isolates the channel-level behavior independent of operating system color management. This is the most reliable way to confirm whether a green tint is a real panel issue or a software artifact that varies by source device.
Related Screen Issues
- Red Screen: Persistent red tint — similar cable and driver causes
- Pink Screen: Pink or purple tint — same color channel imbalance issue
- Orange Screen: Orange tint — cable and calibration causes overlap
- Screen Flickering: Flickering and color tints often share cable issues
- Dead Pixel: Permanently dark pixels — distinct from color balance issues
Conclusion
Green tint on a monitor is fixable in the vast majority of cases. Start with the easiest solutions: reseat or replace your display cable, update or roll back graphics drivers, and reset color channel settings. These three steps resolve green tint in most cases. Hardware causes (backlight aging, T-con failure, panel issues) are uncommon and only warrant professional repair when software fixes fail. Use the screen test tool to verify color channel behavior before and after each fix.