Black Lines on Laptop Screen: Why They Appear
A black line on a laptop screen is a strip of pixels stuck permanently dark — often from hinge flex stressing the display ribbon, or from a dead pixel column inside the panel. This guide covers why it happens on Dell, HP, and Lenovo notebooks, how horizontal vs vertical lines differ, and how to tell a cable fault from panel failure. For a black line on an external monitor or desktop computer screen, see the black line on monitor guide.

What Is a Black Line on Laptop Screen
A black line on a laptop screen is a vertical or horizontal streak of completely black pixels that persists across all screen content. Unlike a dead pixel which appears as a single isolated dot, a black line on laptop screen spans the entire width (vertical) or height (horizontal) of the display. The line is always visible — whether you are viewing a white webpage, a dark video, or a colorful image.
The key characteristic of a black line on laptop screen is that the pixels in that line are permanently off — they display nothing because they are no longer receiving any electrical signal or power. This is fundamentally different from colored lines, which indicate a specific color channel failure.
Vertical vs Horizontal Black Lines
Vertical black lines on laptop screen run from the top edge to the bottom edge. They indicate a column electrode failure — the vertical pathway that delivers data to each pixel in that column has stopped working. This is the most common type of black line on laptop screen and is typically caused by ribbon cable damage near the hinges or a failing T-con output channel.
Black horizontal lines on laptop screen run from the left edge to the right edge. They indicate a row electrode failure — the horizontal pathway has stopped working. Horizontal black lines are less common but often point to different failure modes, including timing controller issues and cable problems affecting horizontal scan signals.
How Manufacturers Define Acceptable Defect Thresholds
Before assuming your laptop is defective, it helps to understand how the industry categorizes "acceptable" defects. The ISO 13406-2 standard (now superseded by ISO 9241-300 series, but still cited by many OEMs) defined four pixel defect classes that laptop manufacturers continue to reference in their warranty terms.
Class I panels allow zero defects of any kind — these are typically reserved for medical and aerospace displays. Class II panels (the most common in consumer laptops) allow a small number of dead or bright pixels per million pixels, but the rules for lines are stricter than for scattered dead pixels. A single isolated dead pixel is usually not covered, but a full dead pixel column or row that produces a visible line is treated as a panel-level defect by Dell, HP, Lenovo, and Apple because it indicates a structural failure of the LCD glass rather than scattered pixel death.
Dell publishes a Premium Panel Exchange program that guarantees zero bright-pixel defects and replaces the panel if even a single bright sub-pixel is found during the warranty period. HP's pixel defect specifications allow a small number of dead or stuck pixels depending on screen resolution — a 1920x1080 panel permits roughly 6 defective pixels per million, while 4K panels allow slightly more. Lenovo ThinkPad displays follow similar ISO-aligned thresholds. Apple's MacBook displays are covered under a separate "defective pixels" policy that treats a single dead pixel in the center of the screen as a defect, while multiple isolated dead pixels are required near the edges before a warranty repair is approved.
In practical terms, if you are seeing a continuous black line spanning the full height or width of the display, your panel is unambiguously defective by every major manufacturer's own policy, regardless of how strict their scattered-pixel rules might be. Document the line with photos before contacting support — see the warranty section below.
What Causes a Black Line on Laptop Screen
1. Dead Pixel Columns (Most Common)
The most common cause of a black line on laptop screen is a dead pixel column — an entire column of pixels where every thin-film transistor (TFT) has failed. When these transistors fail, the pixels display nothing, creating a visible black vertical streak. This can happen from manufacturing defects, aging, physical stress, or static discharge damage to the panel glass.
This is the cause behind searches like "what causes black lines on laptop screen" and "black lines on screen laptop" — the user is trying to understand why this happened, and the answer is almost always a dead pixel column in the LCD glass.
2. Ribbon Cable Damage from Hinge Stress
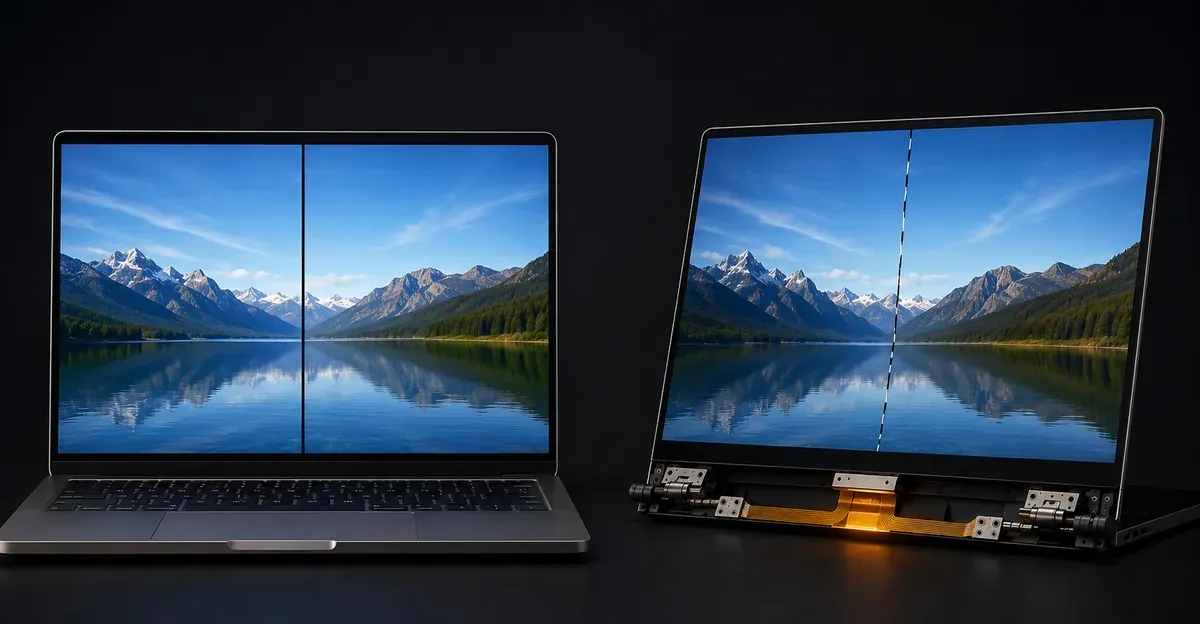
The internal display ribbon cable runs from the motherboard (in the base) through the hinge mechanism to the display panel (in the lid). Every time you open and close the laptop, this cable flexes slightly. Over hundreds or thousands of cycles, micro-cracks form in the cable conductors.
When the cable damage affects the data lines for a specific column or row of pixels, a black line on laptop screen appears. This is the most common cause of sudden black lines that appear after months or years of laptop use.
Why Dell laptops are particularly susceptible: Dell laptops often route the display ribbon cable through a channel in the hinge that creates a sharp bend, accelerating cable wear. Many Dell users report black lines appearing after 1-3 years of regular use.
3. T-Con Board Failure
The timing controller (T-con) board generates the precise signals that drive each pixel column and row. A failing T-con may stop outputting signals to specific columns or rows, creating a black line on laptop screen. T-con failures often appear alongside other symptoms like flickering, color distortion, or partial screen issues.
4. Graphics Card / Driver Issues
While less common, a failing graphics card or corrupted driver can produce black line artifacts that mimic hardware failures. The key indicator is whether the lines appear on an external monitor when connected — if they do, the graphics card or driver is the culprit.
5. Physical Impact or Pressure
Dropping a laptop, closing the lid with an object on the keyboard, or applying pressure to the screen can damage the LCD panel's internal circuitry, causing dead pixel columns that appear as black lines. Physical damage is irreversible and requires panel replacement.
6. LCD Panel Aging and Heat Damage
LCD panels degrade over time. The liquid crystal material and the thin-film transistors that drive each pixel both have finite lifespans. Heat accelerates this degradation — laptops that run hot for extended periods (gaming laptops, workstations, machines with clogged vents) develop panel failures earlier than cooler-running machines. A black line that appears after several years of heavy use is often the first visible symptom of broader panel aging, and additional lines or dead pixels may follow within months.
OLED vs LCD Black Lines: What Is Different
Most laptops still ship with LCD panels, but premium thin-and-light models increasingly use OLED displays. The two technologies fail differently, which affects both diagnosis and repair.
LCD black lines are typically caused by failed thin-film transistors in the source driver, ribbon cable damage, or T-con board failures. LCD panels have a dedicated column driver that talks to every pixel in a vertical strip — when one channel fails, the entire strip goes black, producing a continuous vertical line. LCD lines are usually persistent and reproducible — they show up the same way every time, regardless of content.
OLED black lines look similar but have a different root cause. OLED pixels are individually driven by organic compounds that emit light when current flows through them. When a row or column driver circuit fails in an OLED panel, the pixels in that line lose their signal and go completely black — visually identical to an LCD dead column. However, OLED panels also produce temporary black lines during high-refresh-rate operation or HDR transitions because of how the panel manages per-pixel current. A black line that comes and goes, shifts position, or disappears after the laptop sleeps and wakes is far more likely on OLED than LCD.
Repair-wise, OLED panel replacement is significantly more expensive than LCD — typically $300-800 for OLED laptop panels versus $80-250 for LCD. OLED modules are also more fragile to disassemble because the panel is bonded directly to the digitizer in many touchscreen models.
Brand-Specific Notes
Dell Laptops
Dell laptops are frequently searched for "black line on laptop screen dell" and "black lines on laptop screen dell xps" or "dell laptop screen lines black". Dell uses ribbon cables that route through tight channels in the hinge, which creates a concentration of stress at a single point. This makes vertical black lines from cable damage particularly common on Dell Latitude, XPS, and Inspiron models after 1-2 years of use.
Dell-specific fix: When reseating Dell laptop cables, pay special attention to the cable routing near the left and right hinges. Dell cables often have a protective sleeve that can trap moisture and accelerate degradation.
HP Laptops
HP laptops ("black line on laptop screen hp", "hp laptop black line on screen") use a similar cable routing design to Dell. HP Pavilion, Envy, and EliteBook models are commonly affected. HP cables tend to fail at the connector on the motherboard side more often than mid-cable.
HP-specific fix: On HP laptops, check the motherboard connector first — the connection is often less robust than the panel-side connection and may be the first point of failure.
Lenovo Laptops
Lenovo laptops ("black lines on laptop screen lenovo", "lenovo laptop screen black lines") are generally well-built but not immune to black line issues. ThinkPad and IdeaPad models can develop black lines from cable fatigue, particularly after the laptop has been opened and closed thousands of times. Lenovo's cable design tends to distribute stress more evenly, so cable failures tend to be less sudden than on Dell or HP.
Apple MacBook
MacBook models use a different architecture from Windows laptops, which affects both cause and repair cost. The display assembly on most modern MacBooks is a sealed unit — the LCD/OLED panel, cover glass, and backlight are integrated and cannot be individually serviced. A black line on a MacBook screen almost always requires full top-case assembly replacement rather than a panel-only swap. Repair costs run $400-800 depending on model and warranty status, making AppleCare coverage especially valuable for display issues.
How to Test for Black Lines on Laptop Screen
- Open the screen test tool on your laptop
- Display pure white — black lines will stand out most clearly against a white background
- Display pure black — this reveals whether there are also bright/white lines (indicates multiple issues)
- Display pure red, green, and blue — if the black line disappears on any color, it may not be a true dead column
- Flex the lid — gently open and close the lid while watching the black line. If it changes, flickers, or disappears/reappears, a cable issue is likely
- Connect external monitor — if the external monitor shows no black lines, the graphics card is fine and the panel/cable is the issue
How to Fix a Black Line on Laptop Screen
Fix 1: Software and Driver Solutions
Before opening your laptop, rule out software causes:
- Update graphics drivers from your GPU manufacturer's website (Intel, NVIDIA, AMD)
- Roll back recent driver updates if the black line appeared after a driver change
- Reset BIOS to default settings — display settings in BIOS can occasionally cause artifacts
- Run hardware diagnostics if your laptop manufacturer provides them
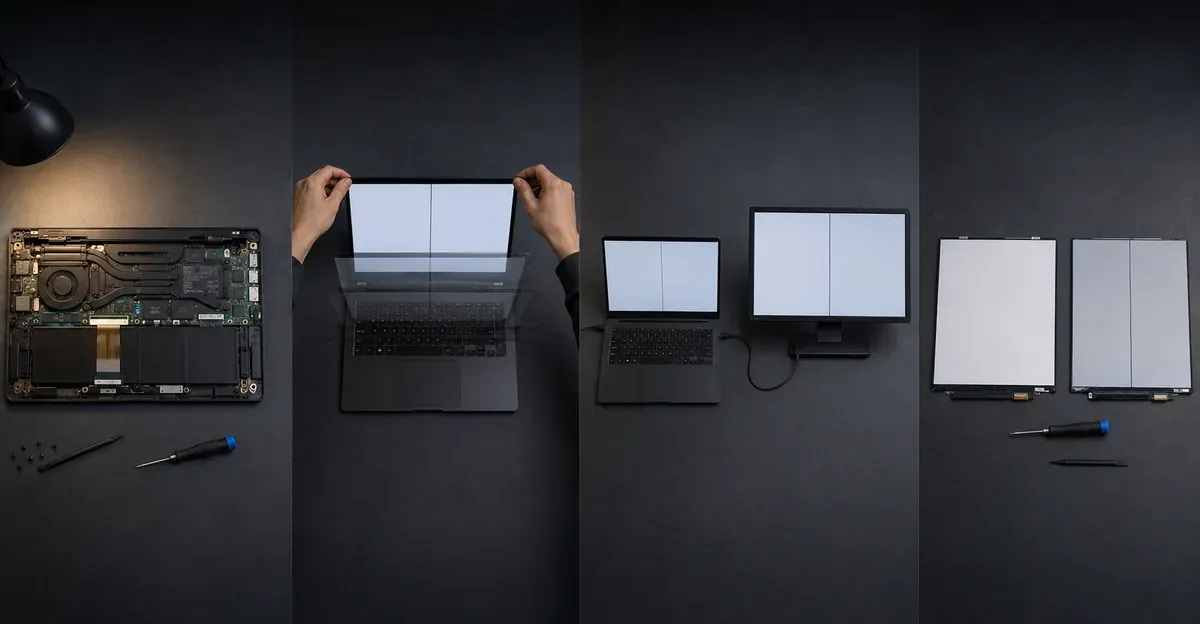
Fix 2: Reseat Internal Ribbon Cables
This is the most effective fix for cable-related black lines on laptop screen:
- Power off completely and disconnect the power adapter
- Consult your laptop's service manual (available from the manufacturer or iFixit for your specific model)
- Locate the display ribbon cable — typically connected to the motherboard near the base hinge and to the display panel at the top of the lid
- Disconnect and reconnect the cable firmly at both ends
- Inspect the cable for visible damage (cracks, dark marks, fraying) — if damaged, replacement is needed
- Reassemble and test — in many cases, simply reseating the connection eliminates black lines
Fix 3: Replace Damaged Ribbon Cables
If inspection reveals visible cable damage:
- Search for replacement cables using your laptop's model number and "display cable" or "LVDS cable"
- Replacement cables typically cost $15-40
- Installation requires disassembly — follow iFixit or manufacturer guides
- After replacement, test the display through full lid opening/closing cycles
Fix 4: Replace the T-Con Board
If reseating cables does not resolve the black line on laptop screen:
- T-con boards for specific laptop models are available from electronics suppliers
- Cost typically ranges from $25-80 depending on the model
- Installation requires moderate electronics repair skill
Fix 5: Replace the Display Panel
If all other fixes fail, the LCD panel itself is damaged:
- Replacement panels are available by screen size, resolution, and connector type
- Cost ranges from $80-250 depending on specifications
- Professional installation is recommended
- Ensure the replacement panel matches your exact model number
When to Use Warranty Repair Instead of DIY
If your laptop is still under manufacturer warranty, stop DIY troubleshooting before you disassemble the machine. Opening the laptop yourself can void warranty coverage for the very defect you are trying to repair, particularly on Dell, HP, and Lenovo machines where tamper-evident seals cover the bezel screws.
Manufacturer warranty paths for a black line on laptop screen:
- Dell: Premium Panel Exchange or standard in-warranty panel replacement. Onsite service available on Latitude, XPS, and Precision lines. Standard turnaround 5-10 business days.
- HP: Carry-in or mail-in service for Pavilion and Envy, onsite for EliteBook and ZBook. Standard turnaround 7-14 business days.
- Lenovo: Depot service for IdeaPad, onsite for ThinkPad. Standard turnaround 5-10 business days. Accidental Damage Protection add-on covers drops but typically does not cover gradual cable wear.
- Apple: AppleCare or standard warranty. MacBook display defects covered under "defective pixels" policy for in-warranty machines. Genius Bar appointment required.
Before sending the laptop in, document the black line with timestamped photos and a short screen recording showing the line on a white background. This prevents the service center from claiming the defect is not reproducible.
How to Document a Black Line for a Warranty Claim
Clear documentation dramatically increases the chance of an in-warranty repair being approved. Follow this checklist:
- Run the screen test tool and capture screenshots of the black line on pure white, pure red, pure green, and pure blue backgrounds. Save each as a separate file with timestamp.
- Record a 30-second video of the line on a white background, panning slowly to show the line spans the full screen height (vertical) or width (horizontal).
- Photograph the lid with the laptop open at 90 degrees and at 120 degrees to show whether the line changes with lid position (helps prove cable failure).
- Take a photo of the bottom label showing the model number, serial number, and warranty status sticker if present.
- Connect to an external monitor and capture a screenshot of the external display showing no line — proves the issue is the internal display, not the graphics card.
- Write a one-paragraph timeline: when you first noticed the line, whether it appeared gradually or suddenly, any drops or impacts the laptop has had, and whether the line is constant or changes with lid position.
Attach this package to your warranty ticket before shipping. Service centers have higher approval rates for claims that arrive with comprehensive documentation.
When Hardware Repair Is Needed
Seek professional repair in these scenarios:
- The black line appeared after a drop or impact — panel damage requires professional replacement
- Cable reseating did not fix the issue, and you do not have electronics repair experience
- Your laptop is under warranty — DIY disassembly can void coverage
- Multiple lines, dead pixels, or color distortion appear together — indicates broader panel failure
- The line is on a MacBook or other sealed-unit laptop where panel-only repair is not feasible
Repair cost ranges: $15-40 for DIY cable replacement, $50-150 for professional labor on a cable or T-con repair, $80-300 for LCD panel replacement parts, $400-800 for MacBook display assembly replacement. These ranges are not manufacturer-published — they reflect typical third-party repair shop and parts-supplier pricing. Source: iFixit repair cost guides and parts supplier catalogs as of 2026.
Prevention Tips
- Support the screen with two hands when opening and closing the lid
- Avoid placing objects on the keyboard before closing the lid
- Use a padded laptop bag during transport
- Keep the laptop cool — heat accelerates cable and panel degradation
- Avoid gripping the lid by one corner — uneven pressure stresses the panel edges
- Close the lid gently — never slam it shut
- Update drivers regularly to prevent driver-induced artifacts from compounding with hardware wear
Related Guides
- Laptop Screen Lines Hub: Overview of all laptop screen line types
- Horizontal Lines on Laptop Screen: Horizontal line issues
- Vertical Lines on Laptop Screen: Vertical line issues
- Black Line on Screen: Black lines on any screen type
- LCD Line Hub: General LCD line repair guide
- Dell Laptop Black Line: Brand-specific guide for Inspiron, XPS, Latitude, Precision
- Lenovo Laptop Black Lines: Brand-specific guide for ThinkPad, IdeaPad, Yoga, Legion
Conclusion
A black line on a laptop screen is most commonly caused by a dead pixel column in the LCD glass, ribbon cable damage from hinge stress, or a T-con board failure. The cause is usually identifiable through a simple screen test and external monitor check. Start with cable reseating — the most common and affordable fix — before paying for panel replacement. If your laptop is under warranty, contact the manufacturer immediately, as display defects including dead pixel columns are typically covered at no cost. Run our screen test tool to confirm whether the line is permanent or intermittent and to document it for any warranty claim.